Surfacing data from WorkView
Filter results widget
The Hyland OnBase - WorkView Filter results widget enables a WorkView Filter to be executed, and the results presented to the portal user.
Results can be shown according to who the user is and/or based on input fields presented to the user to allow them to search/filter the data.
Users can be given the ability to view additional details or items related to an Object from the results and/or submit a form in relation to an Object.
Where a Filter's display columns include an Attribute of type "Document", a download link will be available to allow the user to download the Document.
The first step of configuring the widget is to create a WorkView Filter Configuration. You will then need to add a Filter results widget to a Jadu Homepage and configure it.
Creating a WorkView Filter Configuration
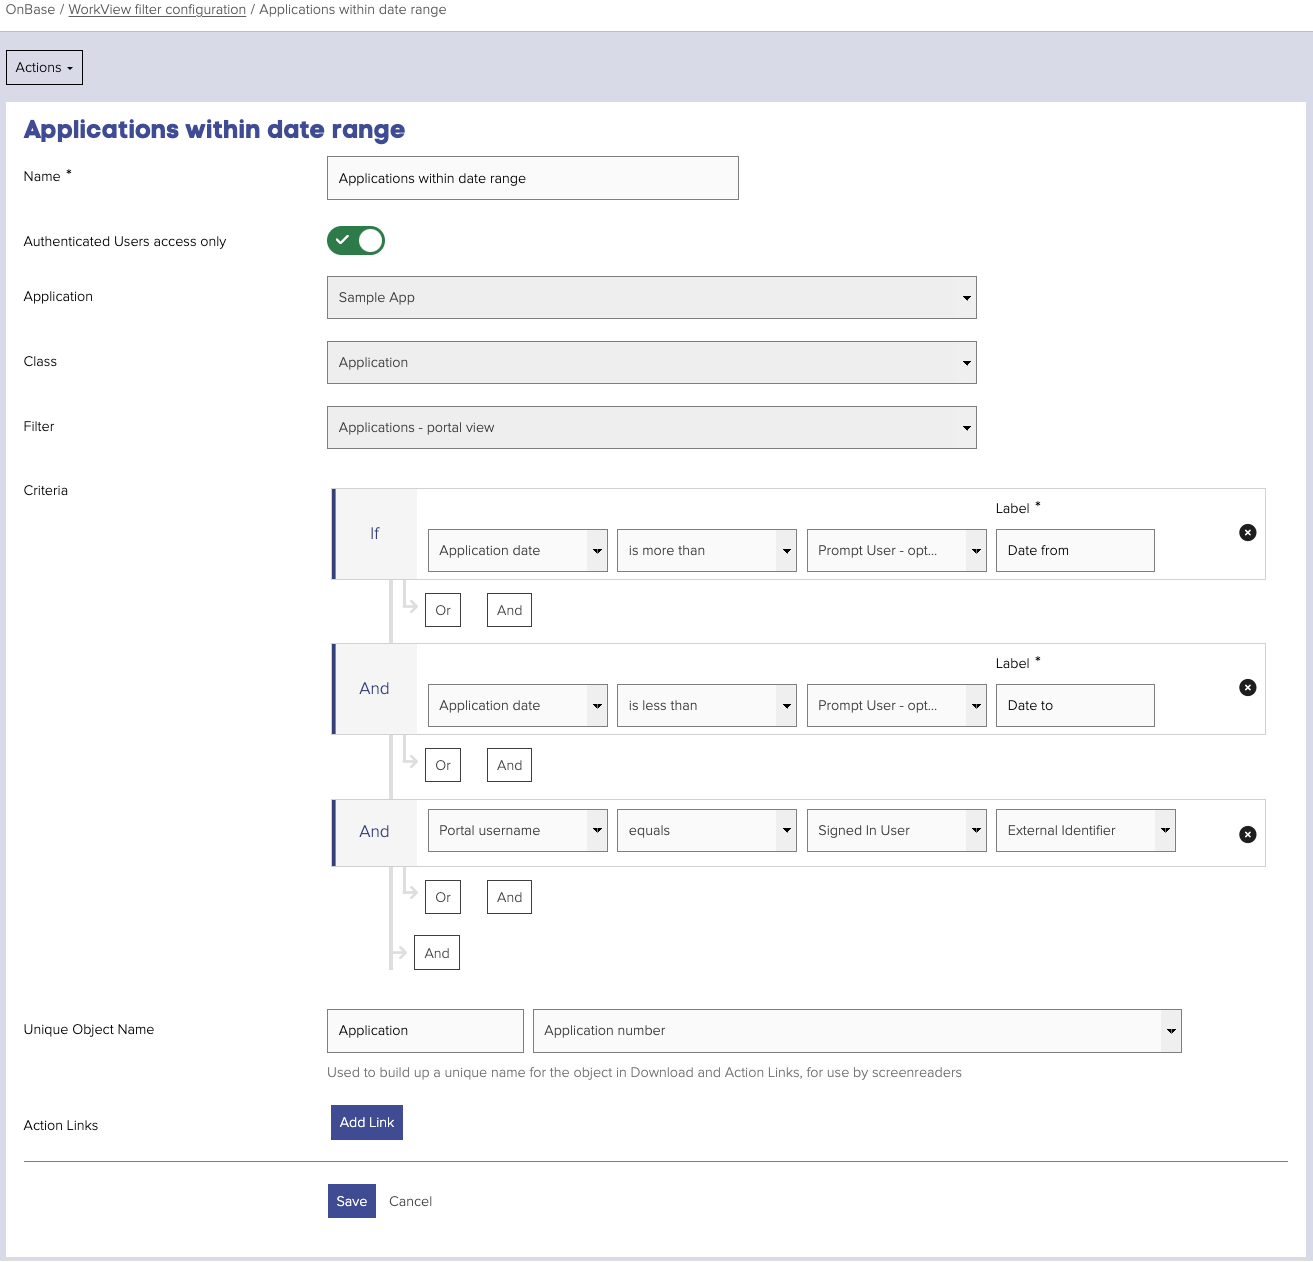
To create a WorkView Filter Configuration:
-
Using the left-hand navigation bar, go to OnBase > WorkView Filter Configuration.
-
Click the Create Configuration button.
-
Give your configuration a name. The name is simply used for identifying the configuration within the system, it is not presented to the portal user.
-
Decide whether portal users must be signed in, in order to view the Filter results. If this is enabled and the user is not signed in to the portal, the Filter results widget will be hidden.
-
Select a WorkView Application. Click Select Application.
-
Select a WorkView Class within that Application. Click Select Class.
-
Select the WorkView Filter which the configuration should be for. Click Select Filter.
-
If your Filter has one or more "User Prompts" defined in WorkView, then you will see an Add Criteria button. When this is clicked, a rule-style interface will be available for building up criteria which determine the results of the filter.
Each row in the criteria consists of:
- the User Prompt Attribute
- the comparator (equals, starts with, ends with, contains, is less than, is more than, is less than or equal to, is more than or equal to, is not equal to, does not have a value, has a value). Note: the options will change according to the datatype of the User Prompt Attribute.
- how the value should be determined:
- Static - allows a fixed value to be specified within the Criteria
- Prompt User - mandatory - will require the portal user to enter a value when viewing the Filter results widget. If they do not enter a value, the filter will not be executed, and they will see an error message.
- Prompt User - optional - will give the portal user the option to enter a value when viewing the Filter results widget. If the user does not enter a value, this row is removed from the criteria when executing the Filter.
- Signed In User (only available if Authenticated Users access only is enabled) - will allow an attribute of the signed-in user to be included as part of the criteria. See also Retrieving Extended User Data.
- Related Object Attribute - allows for displaying results which have an attribute value in common with another WorkView Object. See Related Documents and Objects.
- Related Document Keyword - allows for displaying results which have an attribute value in common with a keyword of a Document. See Related Documents and Objects.
- Calculated Date (only if the User Prompt Attribute is of type Date or DateTime) - allows for a date to be entered as an offset of the current date.
- depending on the selection in the previous field, the final field will be:
- an input field (text, date picker, or dropdown list) to provide the value to use for the Attribute, where Static was chosen
- an input field to provide the label to use for the input field presented to the portal user, where Prompt user was chosen
- a dropdown list of user attributes to select from, where Signed In User was chosen
- dropdown lists to select a WorkView Application, Class, and Attribute, where Related Object Attribute was chosen
- a dropdown list to the select a Document Keyword, where Related Document Keyword was chosen
- a dropdown list to select whether to add or subtract days from the current date, and an input field to enter a number of days, where Calculated Date was chosen.
-
In order to display links in tabular format (i.e. in the Filter results widget), to support portal users who use Screen Reader technology, it is necessary to provide the Screen Reader with a unique identifier for each result so that the user can understand which result the link is for when links are read out of the context of the table. The Unique Object Name can be made up of a prefix (optional) and a Filter display column value.
For example, if the objects returned by the Filter are Cases and there was a Reference column returned by the Filter, you may enter "Case" for the prefix and select the Reference column. If there was an Action Link (see below) configured with link text of "Update", for a Case with a reference of 123 this link would be read out as "Case 123: Update".
If that Case had a display column for an Attribute of type "Document" with name "Evidence", the Document link would be read out as "Download Evidence for Case 123".
-
Finally, Action Links can be configured to show within the widget. By configuring Action Links, you can provide the portal user with the ability to act on a particular Object within the results. This could be used to allow them to provide an update or further information, or to view additional information or items related to the Object.
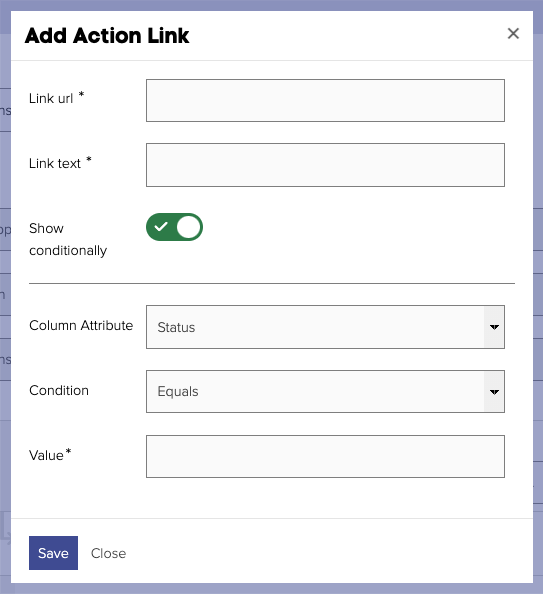
Action links can be configured to display based on the value of a display column from the Filter, or to display for all Objects returned by the Filter.
To add a new Action Link, click Add Link. This will present a popover, prompting for the following settings:
- Link url - enter the URL. This would typically be to a Form or Homepage. The Key of the Object and a secure hash will be automatically appended to the URL, which can then be used within the Form (see Verifying an Object Key in a Form for more details) or by widgets on the Homepage.
If the URL is to a form, it advised that you append/startto the end of the form URL to avoid an in-progress form submission for another WorkView Object being picked up. For example, if the form URL ishttps://my.domain/xfp/form/123, usehttps://my.domain/xfp/form/123/startinstead. - Link text - enter the text to be used when the link is output in the widget.
- Show conditionally - if toggled off, the link will show for all results of the Filter. If toggled on, the link will display according to the condition below.
- Column Attribute - the display column value on which the link visibility is based.
- Condition - choose from "Is Empty", "Is Not Empty", or "Equals".
- Value - if the Condition is "Equals", enter the value to compare with, if this value matches the value of the display column, the link would be visible for that object.
To edit an Action link, click the pencil icon on that row. You will be presented with the same popover as when adding a new Action link, allowing you to edit the setup.
Action links can be re-ordered using the up and down arrows on each row.
To remove a link, click the X icon on that row.
- Link url - enter the URL. This would typically be to a Form or Homepage. The Key of the Object and a secure hash will be automatically appended to the URL, which can then be used within the Form (see Verifying an Object Key in a Form for more details) or by widgets on the Homepage.
Ensure that any Filters to be used within the portal are added to a Filter Bar in WorkView and that the integration service user has access.
Adding the Filter results widget to a homepage
Once you have created a WorkView Filter Configuration, you are ready to add the WorkView Filter results widget to a Homepage and configure it.
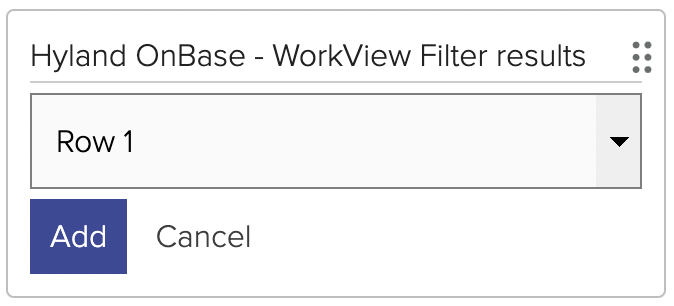
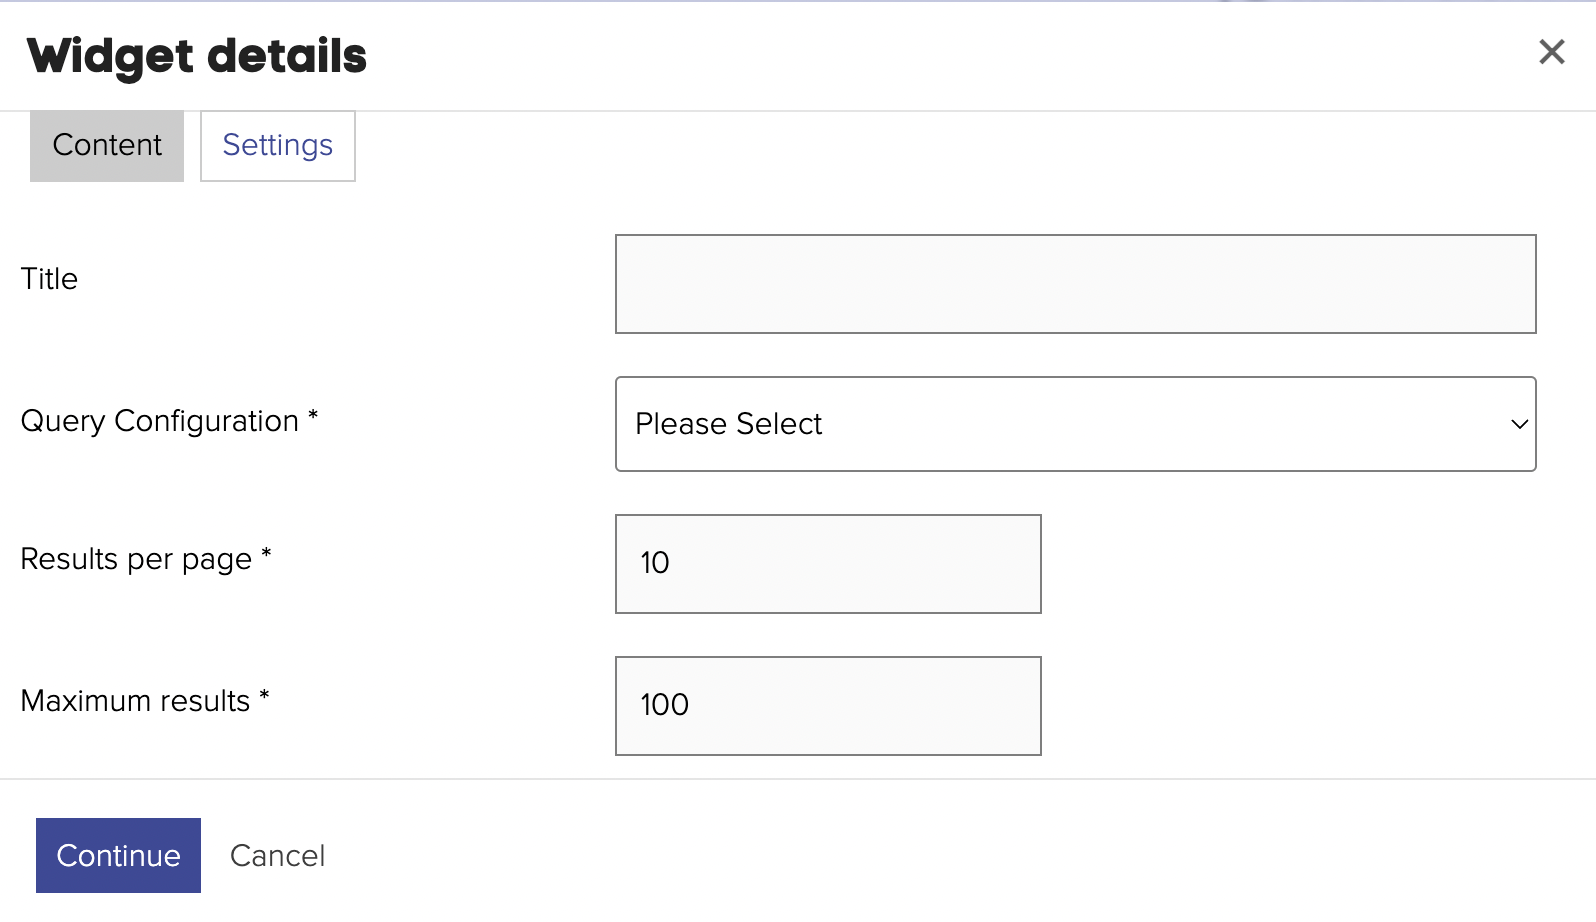
To configure the widget, you will be prompted for the following settings:
- Title - if set, this will be displayed to the portal user above the results
- Filter Configuration - select a Filter Configuration to power the filter results
- Results per page - maximum number of results to show on each page. Pagination will be available within the widget if the total number available exceeds this
- Maximum results - the maximum total number of results to list within the widget
It is possible to use the same WorkView Filter Configuration in multiple widgets, and multiple WorkView Filter results widgets can be used on a single Homepage.
WorkView Object details widget
The WorkView Object details widget allows for attribute values from an Object and/or its related Objects to be output to a Jadu Homepage.
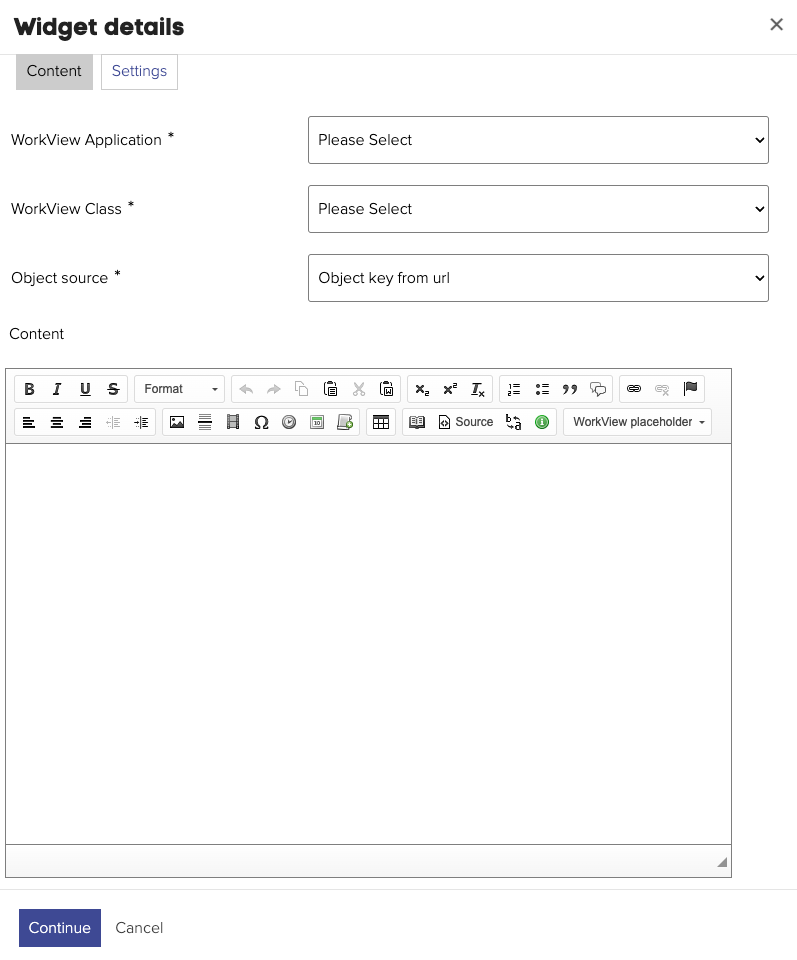
When configuring the widget, the following settings are available:
- WorkView Application - the Application which contains the Object whose details should be displayed
- WorkView Class - the Class of the Object whose details should be displayed
- Object source - how the Object should be determined, choose from:
- Object key from url - use this if the user will access this page by clicking on an Action Link from a WorkView Filter Results widget (e.g. a "View details" link), or from another instance of the WorkView Object details widget (e.g. to see the details of a related Object).
- Single result of a Filter - use this if the Object can be determined by running a Filter and it being a single result, for example an Object in WorkView representing the portal user. If this option is chosen, another setting will appear to select the Filter configuration. Only Filter Configurations without "Prompt User" criteria can be selected. When the Filter is executed, if there is not exactly one result, the widget will not display.
- Content - provides a WYSIWYG editor with the ability to insert placeholders for WorkView Attributes. There are 2 types of placeholder, "Attribute placeholder" and "Object link placeholder", both are accessible from the "WorkView placeholder" dropdown menu in the editor toolbar.
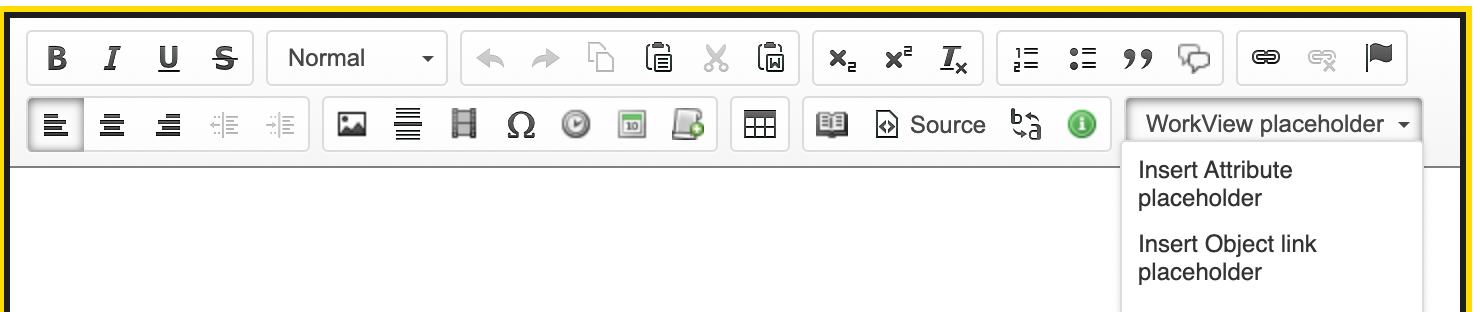
Attribute placeholder
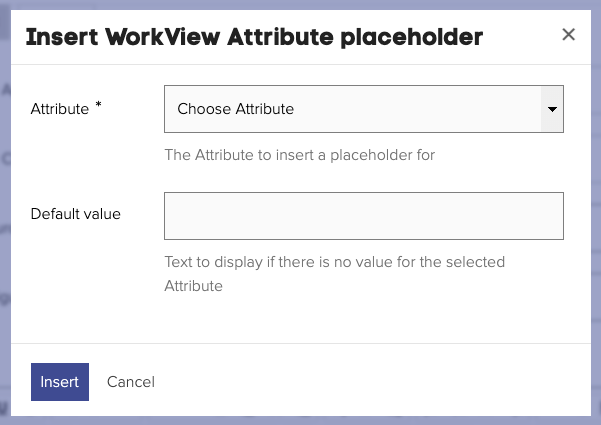
When inserting an Attribute placeholder, a modal will appear to allow you to configure the placeholder.
First choose the Attribute, this may be an Attribute of the current object, or of a related Object. If the chosen Attribute is of type "Document", in the widget this will be displayed as a link to download the Document, so additional settings will be available to set the link text, and optionally CSS class(es) if, for example, you wish to display the download link as a button.
Regardless of the Attribute chosen, it is also possible to add a default value, to be used if the Attribute has no value.
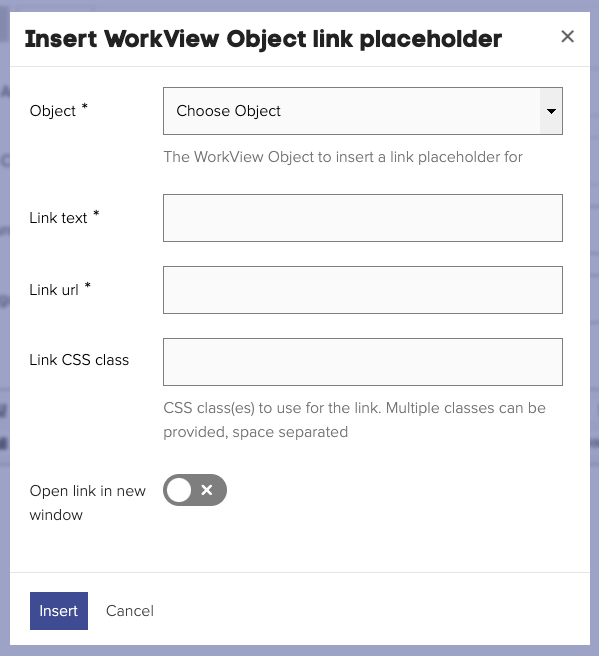
Object link placeholder
An Object link placeholder will result in a link being generated to the given URL, appending the Object key and secure hash. This could be used for linking to a form to take action upon the Object, or to another Jadu Homepage containing a WorkView Object details widget.
When inserting an Object link placeholder, a modal will appear to allow you to configure the placeholder.
First choose the Object, this may be the current or a related Object. Then enter the link text and URL. Optionally provide CSS class(es) if, for example, you wish to display the link as a button, and decide if you want the link to open in a new window.
WorkView Conditional Content widget
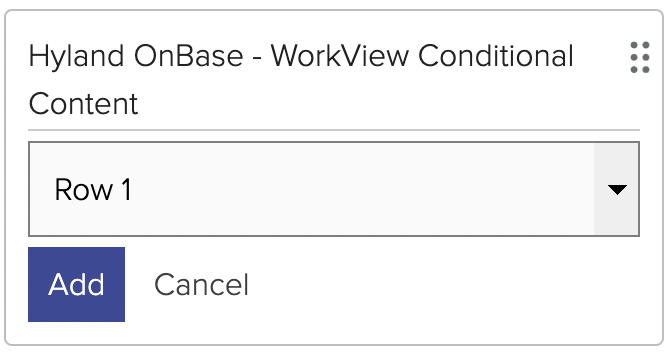
The Conditional Content widget allows content to be conditionally displayed based on the results of a WorkView Filter. This may be used where there is a requirement to only display content if some condition is true, based on details held in WorkView about the portal user.
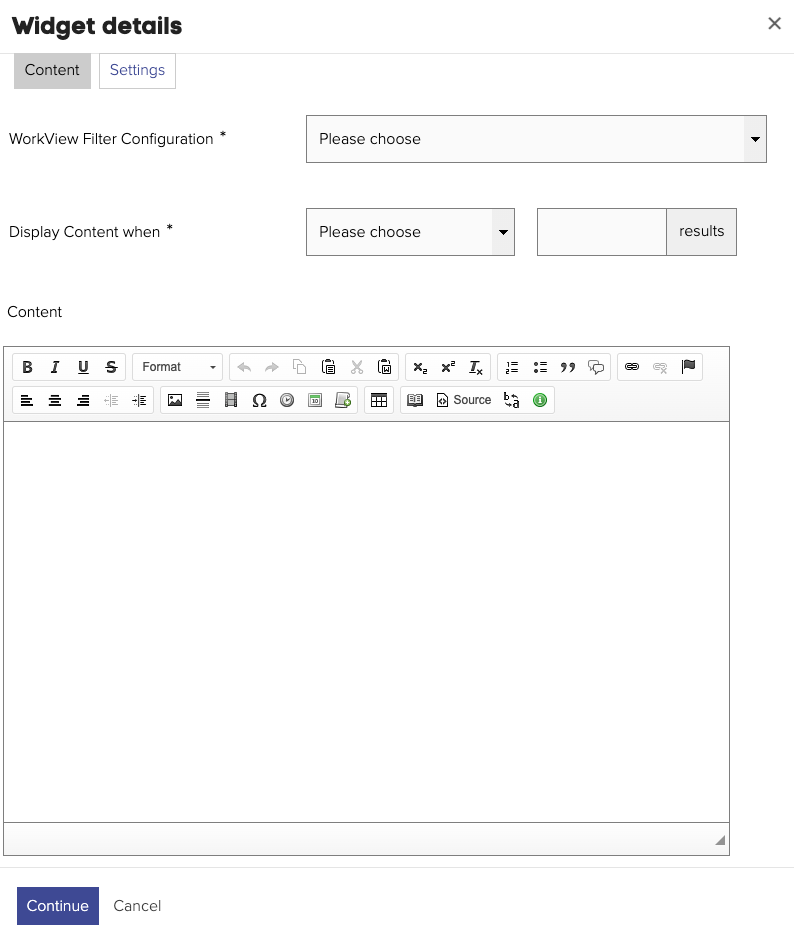
When configuring the widget, the following settings are available:
- WorkView Filter Configuration - the Filter Configuration which specifies the Filter to be run and the criteria which should be used. Only Filter Configurations without "Prompt User" criteria can be selected.
- Display Content when - the condition as to when Content should be displayed, select from:
- Filter has more than x results
- Filter has less than x results
- Filter has exactly x results
- Content - provides a WYSIWYG editor to input the content to be displayed when the relevant condition is matched
If there is an error executing the Filter, no content will be displayed.
Secure Object links
All Action links in the Filter results widget and links generated by the Object Details widget are protected by a secure hash. The purpose of this hash is to detect if the user has tampered with the Object Key within the URL in an attempt to gain access to, or modify an Object that they should not be able to.
If a user is signed in when the object link is generated, they will need to be signed every time they wish to access the Object with that link. If they are not signed in, the link will only be valid for the remainder of their browser session.
Verifying an Object Key in a Form
When a form is linked to from the WorkView Filter Results widget, the Object key and a secure hash will be appended to the form URL. The Object key can then be used within the form to perform actions on the Object, e.g. updating it and/or retrieving attribute values. The purpose of the hash is to detect if the user has tampered with the Object key in the URL in an attempt to provide an update for or gain access to an Object that they should not be able to.
If the user is signed in when viewing the widget, they must be signed when using the form link. If the user is not signed in when viewing the widget, the form link will only be valid for the remainder of their browser session.
Firstly, you will need to set up URL injection prefills on the form in order to capture and store the Document ID and hash.
The URL parameter keys required for doing this are documentId and hash.
It is advised that these are prefilled into hidden fields on the form.
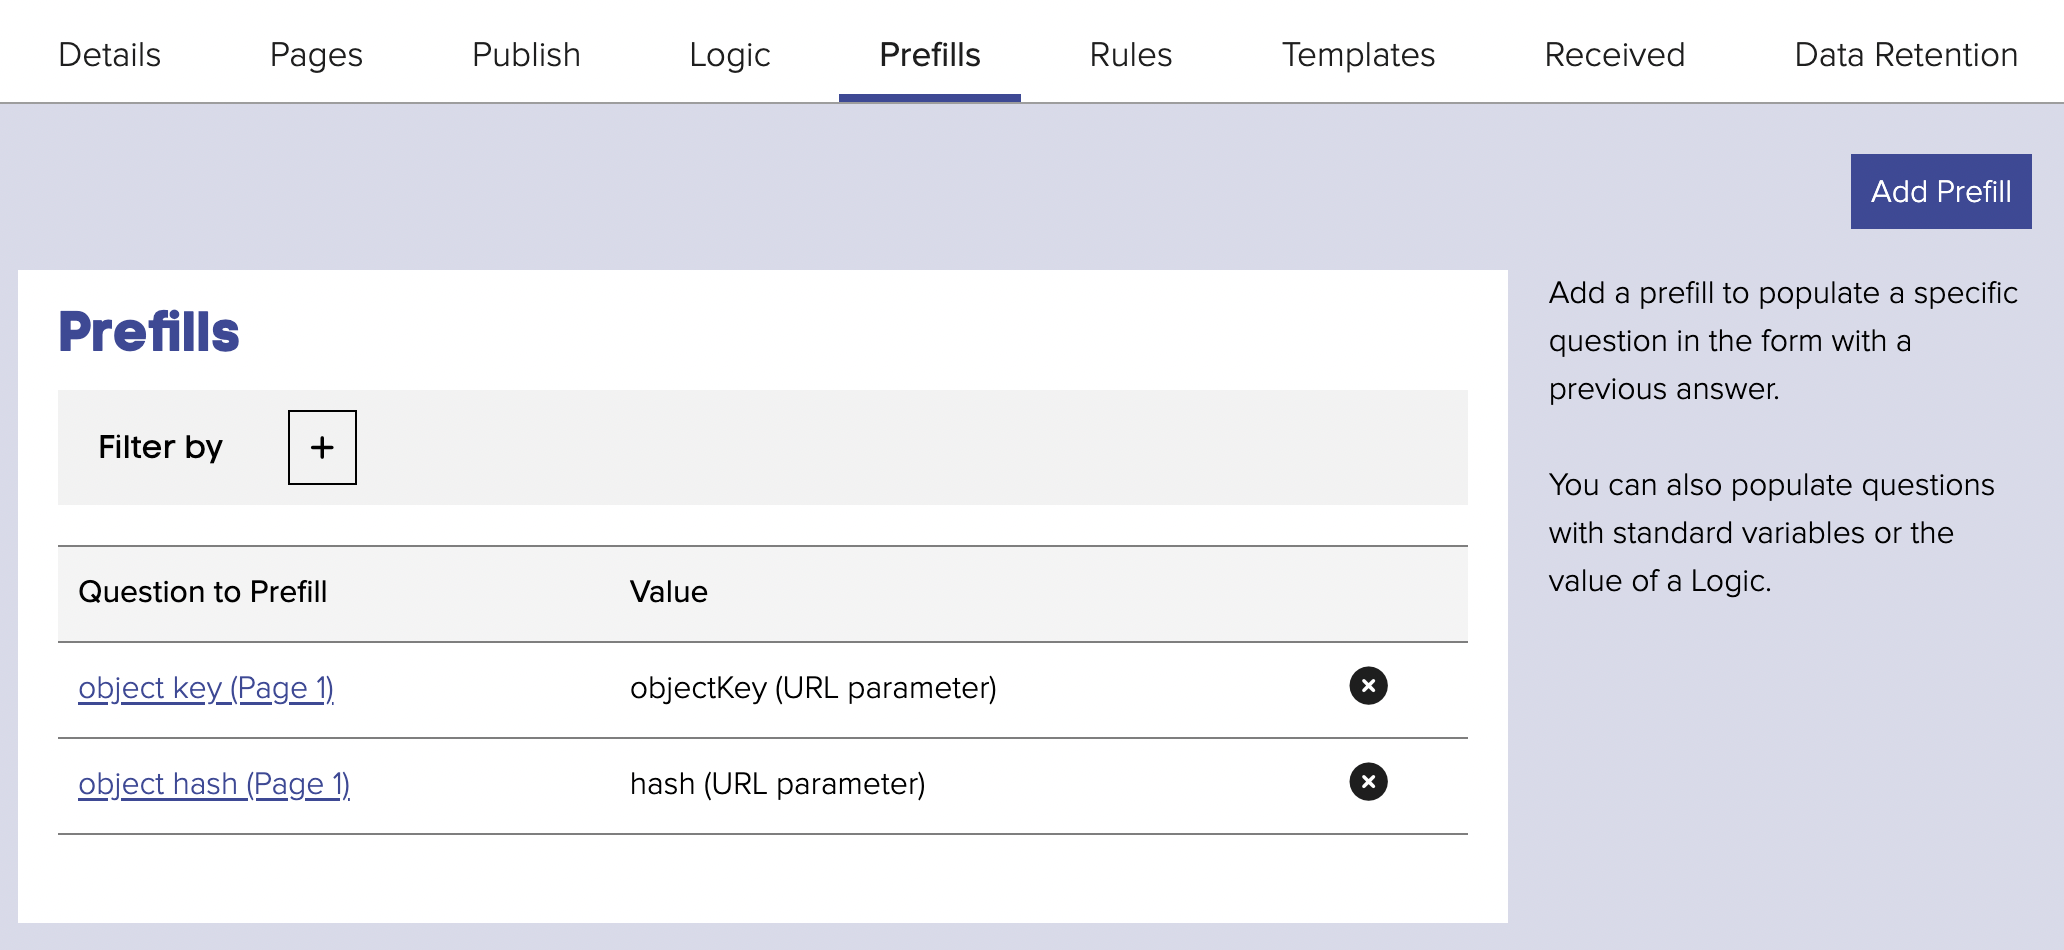
There is a Form Logic available to verify that the hash and Object key injected into the form are valid (i.e. that the Object key has not been tampered with). See Verify Object key