Questions
Most pages in your form will have at least one question. When in the page builder, adding questions can be done in one of two ways.
Adding a question to a page
- Navigate to the page management area, and open the page you wish to add the question to.
- Either: Click, hold and drag the required page element from the left hand panel to the drop area on the right hand side. The settings panel for the page element will open.
- Or: Click on an element in the toolbox, the element will will expand and provide a dropdown of all sections currently on the page. Select the one where you wish to add the question, and click the Add button. The question will be added to the bottom of this section, and the settings panel for the page element will open.
- The fields available vary depending on the element being added. Complete the required fields, and click the Add Question button. The question will be added to the page preview area.
- Click the Save button to save your changes.
- Click Return to Form Structure button which can be found on the right hand side towards the top of the page.
From Jadu Central 4.1.0, you can smartmap a question to a Jadu Connect field. The Create case and Edit case actions use the smartmappings to auto-populate.
You can drop a question in one of two places:
- any shaded area labelled There are currently no questions, this is the case when you're adding the first question to a page or section.
- above or below any page elements already on your page. To do this, just drag and hold the new element over the existing one, and you'll see areas appear above and below that element that you can then drag into.
Updating a question on a page
Any question can be edited in the page builder. To do this:
- Navigate to the page management area, and open the page you wish to edit the question on.
- In the preview of the page, click on the question to be edited.
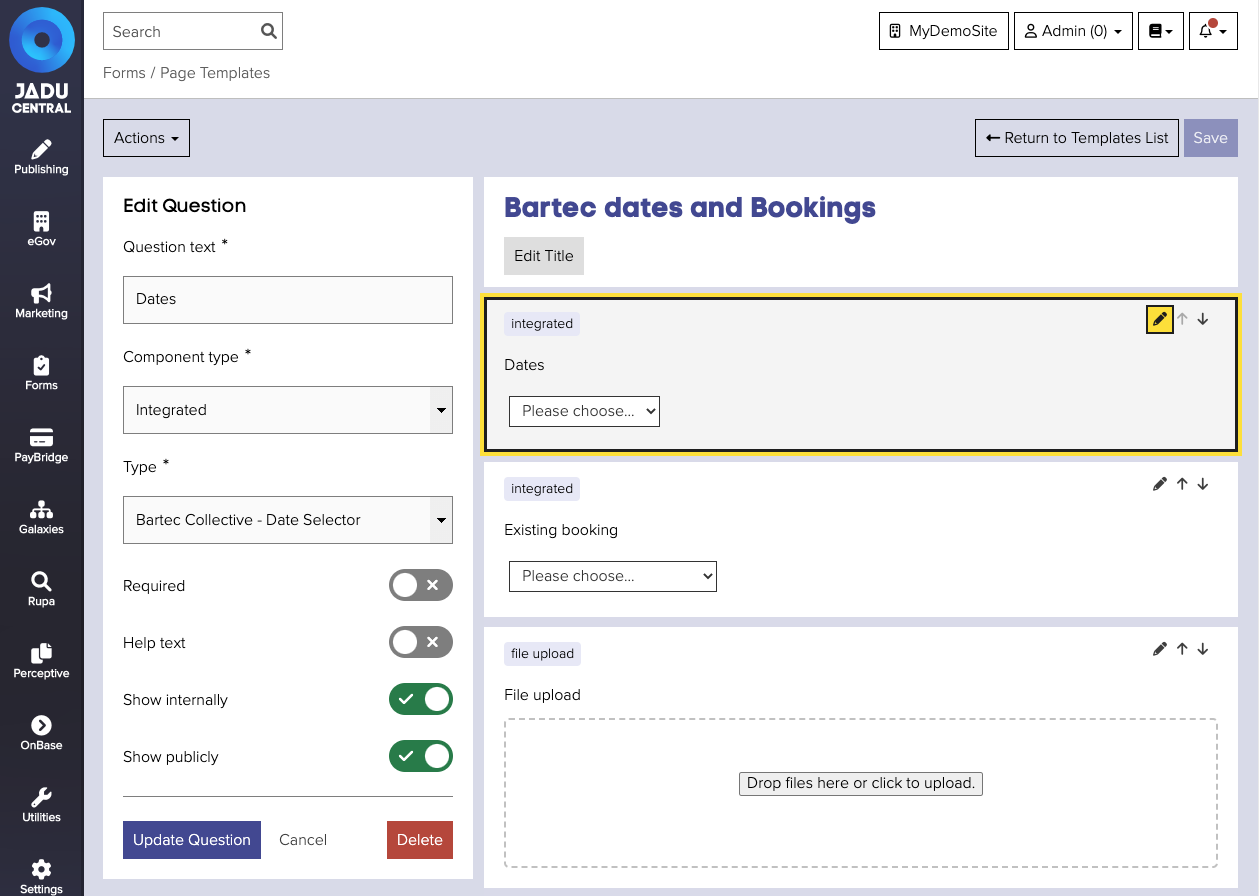
- The question will become highlighted, and the settings pane will open on the left hand side, populated with this question's settings.
- Make the required changes and click the Update Question button. The settings pane will close, and the preview will update to reflect the changes to the question.
Changes made to the form structure can affect data exports.
Removing a question from a page
Any question can be removed in the page builder. To do this:
- Navigate to the page management area, and open the page you wish to remove the question from.
- In the preview of the page, click on the question to be removed.
- The question will become highlighted, and the settings pane will open on the left hand side, populated with this question's settings.
- In the settings pane, click the Delete button, a confirmation panel will be shown.
- Confirm the change, the settings pane will close, and the preview will update to remove the deleted question.
Changes made to the form structure can affect data exports.
Setting the visibility of a question
Each question has two toggles for visibility in the page builder. One controls whether the question is visible on the online form, and the other whether it is visible on the internal form. Both of these can be on (question shown online and internally), or one may be off. It is not possible to hide a question in both the internal form and the online form.
To change a question's visibility:
- Navigate to the page management area, and open the page you wish to remove the question from. In the preview of the page, click on the question to be removed.
- The question will become highlighted, and the settings pane will open on the left hand side, populated with this question's settings.
- In the settings pane, toggle Show internally and Show publicly to the required positions.
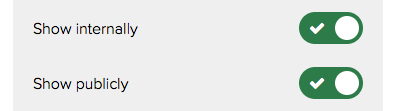
- Click the Update Question button. The setting pane will close, and the changes to visibility will be saved.
Making questions required
Any question can be marked as required in the page builder. This means that a customer will have to answer it to proceed to the next page of your form.
To mark a question as required:
- Navigate to the page management area, and open the page you wish to remove the question from. In the preview of the page, click on the question to be removed.
- The question will become highlighted, and the settings pane will open on the left hand side, populated with this question's settings.
- In the settings pane, toggle Required to the on position (green).

- Click the Update Question button. The setting pane will close, and the question preview will update to show that the question is required.
Adding help text
Each question can have help text applied, which will show as text underneath the question. Help text is useful for explaining to the customer what you expect them to enter into the question, and can prevent unnecessarily lengthy question text.
To add help text to a question:
- Navigate to the page management area, and open the page you wish to remove the question from. In the preview of the page, click on the question to be removed.
- The question will become highlighted, and the settings pane will open on the left hand side, populated with this question's settings.
- In the settings pane, toggle Help text and enter some text into the text area that appears.

- Click Update Question. The setting pane will close, and the help text will be visible in the updated question preview.
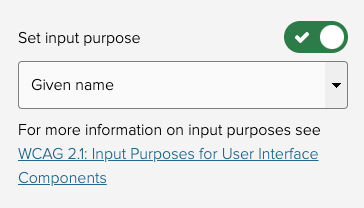
Setting an Input Purpose of a Question
Modern web browsers provide a way to autofill values into form questions. In order to instruct the browser on the appropriate value to autofill the question with an input purpose has to be set on the question. Setting the purpose of a form input (question) is a WCAG 2.1 AA requirement.
The input purpose can be set on Text field, Date, Textarea and Dropdown component types. The Location component and Address lookup integrated components will set the Postcode fields input purpose to Postcode/ZIP Code automatically.
Autofill values are only applied to web and embedded forms. Internal forms used by Customer Service Advisors will not autocomplete the questions.
Shared devices such as those used in public spaces e.g. Libraries and Contact Centres should have autocomplete disabled in the browser settings to ensure that user details are not stored in the browser. You should ensure any shared device is configured correctly to not leak user information.
To set the input purpose:
- Open a page template.
- Add a new question to the page or click on an existing question to open up the settings panel.
- Toggle on the Input Purpose setting.

- Choose the appropriate input purpose for the question from the listed purposes.
- Click Add Question or Update Question if editing an existing question.
Input Purposes
The options you can choose from come form the WCAG 2.1 specification.
| Name | Description |
|---|---|
| Full name | Full name |
| Prefix or title | Prefix or title (e.g. Mr, Ms, Dr) |
| Given name | The given (or "first") name |
| Additional names | The middle name. |
| Family name | The family (or "last") name. |
| Suffix | Suffix (e.g. Jr, B.Sc.) |
| Nickname | A nickname or handle. |
| Job title | A job title, or the title a person has within an organisation |
| Username | A username or account name. |
| Organisation | A company or organisation name |
| Street Address | A street address. This can be multiple lines of text, and should fully identify the location of the address within its second administrative level (typically a city or town), but should not include the city name, ZIP or postal code, or country name. |
| Street address - Line 1 | Each individual line of the street address. |
| Street address - Line 2 | Each individual line of the street address. |
| Street address - Line 3 | Each individual line of the street address. |
| Address - Level 4 | The most fine-grained administrative level, in addresses with four administrative levels |
| Address - Level 3 | The third administrative level, in addresses with three or more administrative levels |
| Address - Level 2 | The second administrative level, in addresses with at least two of them. In countries with two administrative levels, this would typically be the city, town, village, or other locality in which the address is located. |
| Address - Level 1 | The first administrative level in the address. This is typically the province in which the address is located. In the United States, this would be the state. In Switzerland, the canton. In the United Kingdom, the post town. |
| Country code | A country or territory code. |
| Country name | A country or territory name. |
| Postal/ZIP code | A postal code (in the United States, this is the ZIP code). |
| Transaction currency | The currency in which the transaction is to take place. |
| Transaction amount | The amount, given in the currency specified by "transaction-currency", of the transaction, for a payment form. |
| Language code | A preferred language, given as a valid BCP 47 language tag |
| Birthday | A birth date, as a full date. |
| Day of birth date | The day of the month of a birth date. |
| Month of birth date | The month of the year of a birth date. |
| Year of birth date | The year of a birth date. |
| Gender identity | A gender identity |
| URL | Home page or other Web page corresponding to the company, person, address, or contact information in the other fields associated with this field |
| Telephone number | A full telephone number, including the country code. |
| Telephone - Country Code | Country code component of the telephone number |
| Telephone - Without Country Code | Telephone number without the county code component, with a country-internal prefix applied if applicable |
| Telephone - Area Code | Area code component of the telephone number, with a country-internal prefix applied if applicable |
| Telephone - Without Country or Area Code | Telephone number without the country code and area code components |
| Telephone - Local Prefix | Exchange number within the telephone number without the country and area code components |
| Telephone - Local Suffix | Number within the exchange within the telephone number without the country and area code components |
| Telephone - Extension Code | A telephone extension code within the phone number |
| Email Address | An email address. |
| Instant messaging address | URL representing an instant messaging protocol endpoint |