Load balanced environment
Basic load balancer setup architecture is show as below
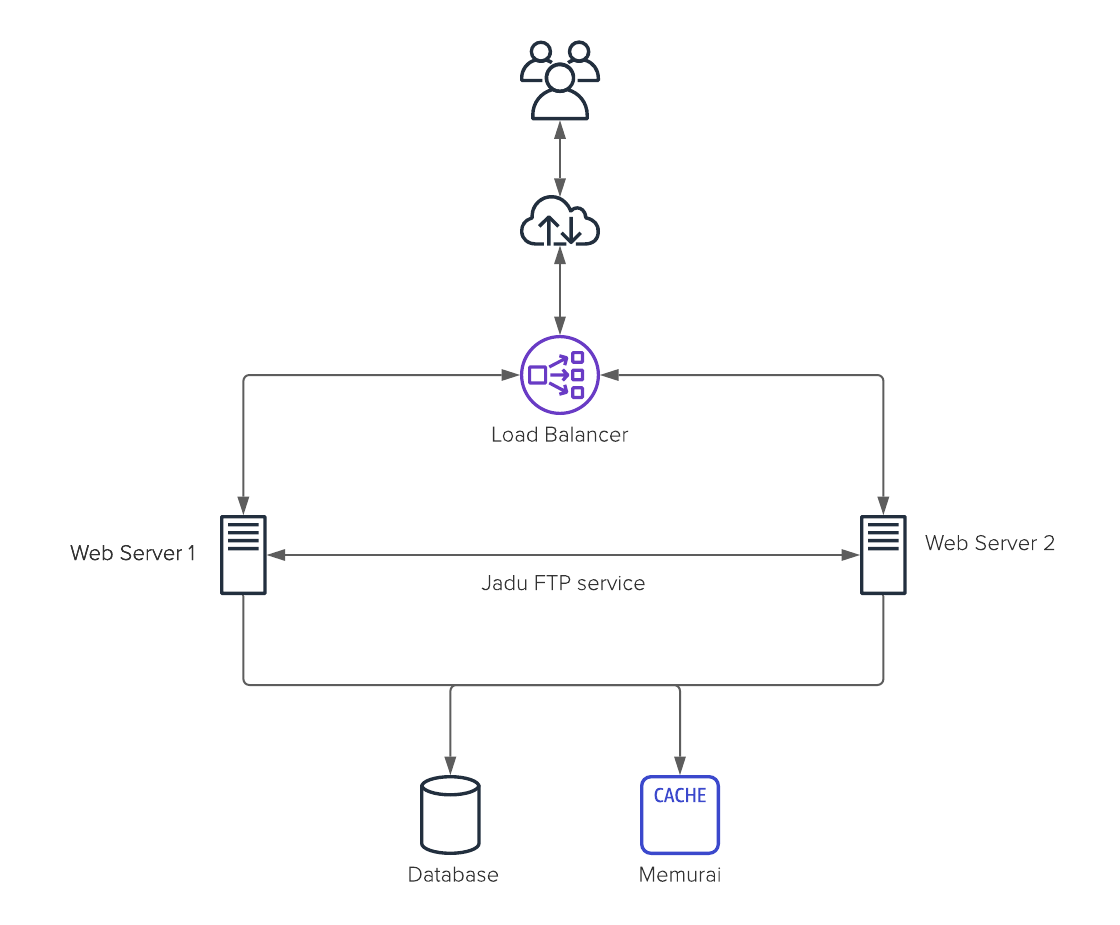
For the load balance Memurai is a mandatory component as we will be using Memurai for the sessions and cache management.
You can have any number of web servers.
Install all the prerequisites on all the web servers.
It is good practice to have the database and Memurai separated from the web server. The database and Memurai can be on the same server or can be separated too.
Installation
The process is similar to the installation of Jadu on a single server, except for a few extra steps.
Run prerequisites check on node 1
- Download the installer from Jadu
- Upload the TLS file into the server
- Create params.yml from params.yml-WINDOWS and populate the values
- Run the prerequisites check command
$ php installer.phar check:setup
Install the application on node 1
You will be running the install command on main node as
$ php installer.phar install
Run prerequisites check on other nodes
- Download the installer from Jadu into all web servers
- Create params.yml from params.yml-WINDOWS and populate the values you can exclude tls file configuration here
$ php installer.phar check:setup --application-only
Install the application on other nodes
You will be running the install command on other node as
$ php installer.phar install --application-only
Disable application tasks on other nodes
The application schedule tasks are supposed to run only on the main node.
So follow the step on all other nodes:
- Go to Task Scheduler
- Select Jadu from the left pane list, this should show all the Jadu related scheduled task
- Select all the task other than JaduIISConfigupdater and disable them
Setting up Jadu Cluster sync
The following steps should be done all web node
- Create a new user jadu_ftp user
- Go to IIS and select the main server
- Select FTP Firewall Support
- Set Data Channel port range to 2000-2100
- Apply the changes by clicking the apply on the right pane
- Go back to main server and right click and select Add FTP Site
- In Add FTP Site dialog box, give a unique name to the site like wincms_ftp for FTP Site Name and Select the Jadu install path on the Physical Path and click Next
- In Binding and SSL setting page, select Allow SSL and select your SSL certificate for the site and leave all others as it is and click Next
- In Authentication and Authorization information dialog select Basic Authentication type. Under Authorization select Allow access to Specific Users and in the below text box specify the jadu_ftp user . Select both Read and Write permissions and click Finish
- Now you can see a new FTP site on your IIS
- Go to your finder and select you base installation path and add permission to the folder so that jadu_ftp user has access to read, write and modify.
- Now go to config directory of the installation path and make a copy of clustersync.xml.example file and name it as clustersync.xml in the same directory.
- Restart FTP services in Services.msc
- Update the serverAddress to the IP address of current node
- Update the servers with list of the all webnode IPs with the ftp username and password appropriately
- The attribute multimedia should be set to 1 only for the main node where the scheduled task is set to run
Setting up shared application cache and session
To set the application to use Memurai for the session, update the php.ini file
session.save_handler = redis
session.save_path   = tcp://{redis-host}:{redis-port}
To set the application to use Memurai for the cache, update the node cache_data_store in config/system.xml to use Memurai instead of files.
<cache_data_store>redis</cache_data_store>
In config/datastore.xml, update the connection details in the server node of the Redis block:
<?xml version="1.0" encoding="utf-8" ?>
<datastore xmlns:config="http://www.jadu.co.uk/schema/config">
  <redis>
     <servers>
        <server host="1.2.3.4" port="6379"/>
     </servers>
  </redis>
</datastore>
Troubleshooting
If your architecture is load balanced, and you are experiencing timeout issues, then the recommendation is you increase the timeout.
To increase the timeout you have to do it in two places:
- Update the max_execution_time in php.ini to 120
- Update the fast cgi execution to 120, to do it go to IIS select the main server, click the FastCGI Settings. You can see the the php-cgi.exe entry, right click the entry and select edit and change the Activity Timeout in the dialog box to 120
- Now restart the IIS server