Managing SAML Authenticated Users
Once the SAML Admin Authentication integration has been enabled and configured, you can add SAML accounts as users in Jadu Connect.
Jadu Connect links a user account to a SAML account by setting the SAML External ID field on the user record. This can be done in two ways:
- Manually, on a per-user basis.
- Via a bulk CSV import of mappings.
The SAML External ID must match the NameID value provided by the Identity Provider.
For example, if the NameID element in the SAML response is:
<saml:NameID>399adbaa-470c-4eb4-c25c-ce4fe10b84ca</saml:NameID>
The SAML External ID should be set to 399adbaa-470c-4eb4-c25c-ce4fe10b84ca
Creating a SAML Authenticated User
New Users
If the user account doesn't exist within Jadu Connect yet, follow these steps:
- Open Settings > User Management > Users, a list of users will be shown, with an option to create a New User.
- Click the New User button. Complete the form and click Save to create a new user account.
- Locate the new user in the Users list and open the record.
- Enter the SAML ID into the SAML External ID field.
- Click the Save button to save the changes.
Existing Users
If a user account already exists within Jadu Connect, follow these steps:
- Open Settings > User Management > Users, a list of users will be shown.
- Locate the user account from the list of users and open the record.
- Enter the SAML ID into the SAML External ID field.
- Click the Save button to save the changes.
Bulk Creating SAML Authenticated Users via CSV Import
Administrators can import a CSV file containing email addresses and corresponding SAML External ID values to update mappings efficiently. There are two import modes available: one for live updates and one for validation only.
Before proceeding with the import, ensure you have the following:
- A CSV file containing two columns:
- email: The user's Jadu Connect account email address.
- saml_identity: The NameID value provided by the Identity Provider (IdP).
- Access to Jadu Connect with the "Import SAML user mapping data" permission.
Importing Mappings
-
Prepare the CSV File. Create a CSV file with the following structure:
email,saml_identity
user1@example.com,123456789
user2@example.com,987654321
Ensure the column headers are exactly as shown (case-sensitive and no space between headings).
Each row must contain a valid email address and the corresponding SAML identity value.
-
Open Settings > System > Data Import.
-
From the Actions menu select Import SAML user mappings to update user mappings immediately or alternatively, select Import SAML user mappings (test only) to validate the file before applying changes. Test mode allows you to check for errors before making changes, ensuring data integrity.
-
In the import modal, find and select the CSV file from your computer in the Import file field.
-
Click Import to proceed, or Test Import if test only mode was selected.
At this stage, the file will be processed. If test mode was selected, validation will occur without making changes.
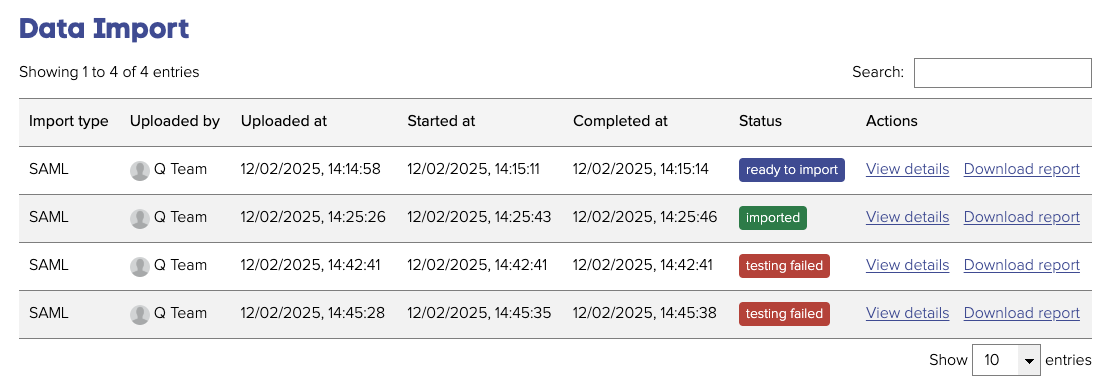
- After processing, mappings will be updated (unless in test mode). To view results, select the View details link from the import entry row to view the results of the import. Alternatively select Download report to download a CSV file containing the results of the import.
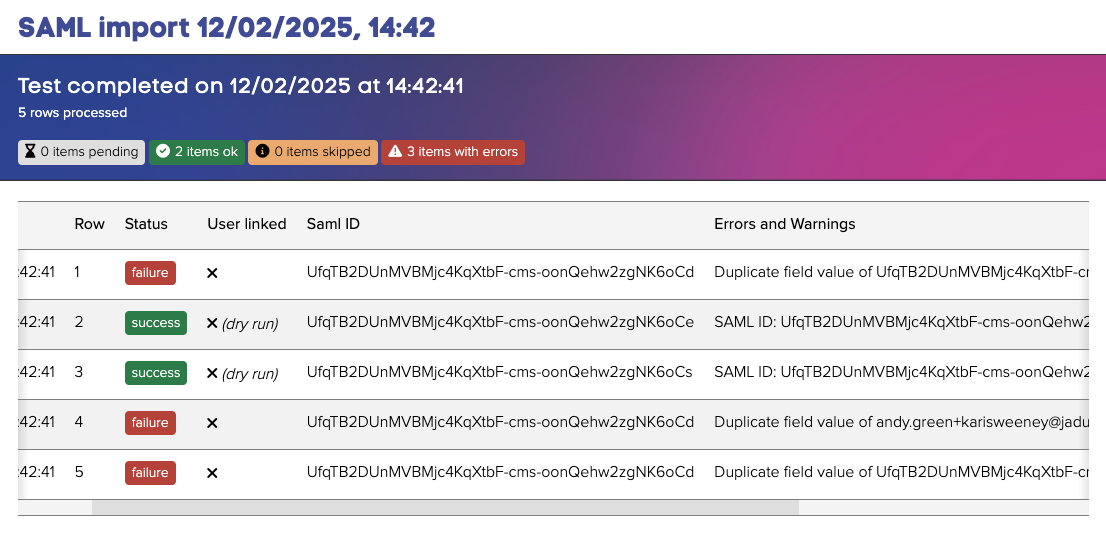
Understanding the Import Report
CSV imports are generally straightforward, but errors may occur due to formatting issues, missing data, or incorrect user details. The table below outlines common errors and warnings, along with their resolutions. If issues persist, review your CSV file and retry the import.
| Errors and Warnings | Resolution |
|---|---|
| Unable to upload CSV due to missing columns: email, saml_identity | Ensure the CSV headers are formatted exactly as email,saml_identity (case-sensitive, no spaces). |
| Duplicate field value of ... for email found on rows: ... . | Remove the duplicate email entries from the CSV before retrying the import. |
| Duplicate field value of ... for saml_identity found on rows: ... . | Remove the duplicate SAML identity values from the CSV before retrying the import. |
| No user found with email address: ... . | Ensure that a Connect user exists with the specified email address. If not, create the user account before proceeding. |
| SAML ID: ... exists and would be overwritten. | The existing SAML External ID for the user will be replaced with the new value. Confirm this change before proceeding. |
| SAML ID: ... exists and has been overwritten. | The user's SAML External ID has been successfully updated to the new value. No further action is required. |
Removing SAML Authentication From A User
If you no longer wish for the user account to use SAML authentication to log in, follow these steps:
- Open Settings > User Management > Users, a list of users will be shown.
- Locate the user account from the list of users and open the record.
- Remove the contents of the SAML External ID field.
- Click the Save button to save the changes.
After saving the user will not be linked to a SAML account and will not be able to log in with their SAML account credentials. Once saved, the user will no longer be linked to a SAML account and must log in using their email and password. If you want to prevent access entirely, disable the user by unchecking the Enabled field before saving.